Level Lifters
Table of Contents
- Overview of Level Lifters
- Unlocking Level Lifters
- Level Lifter Passing Requirements
- Level Lifter Interviews: An Alternative Means of Assessment
Overview of Level Lifters
'Level Lifters' is the name we use for the assessments students take to move up a level in both the addition/subtraction and multiplication/division programs.
Level Lifters allow students the opportunity to demonstrate that they are able to efficiently apply the strategies they have been practicing at their current level and from previous levels. Level Lifters (and Placement Tests) are the only time that students are asked to solve math facts prompts without being provided an accompanying strategy for solving.
Each level lifter comes in 3 parts:
- First operation fact problems: either addition or multiplication
- Second operation fact problems: either subtraction or division fact problems
- Results:
- If a student passes, they receive a 'Congratulations' message.
- If a student does not pass, they are shown their Level Lifter report to help them see what progress they still need to make.
- Note: Student Level Lifter reports do not provide the response rate in seconds. Rather, their responses are placed in three categories: Correct response, fluent; Correct response, not yet fluent; and Incorrect response.
Unlocking Level Lifters
Typically, students need to 'unlock' a Level Lifter. They can do this in two ways.
How Students Unlock the Level Lifter for the First Time
To unlock a Level Lifter for the first time, students must complete all of the activities on the student dashboard. A checkmark appears on the top right of a menu option when it is completed. When all activities have been completed, the Level Lifter button becomes clickable.
Students do not need to begin the Level Lifter once it has been unlocked. They are welcome to continue practicing until they feel ready.
How Students Unlock the Level Lifter for Subsequent Attempts
To unlock the Level Lifter again (after not passing it), or to unlock a Level Lifter in the super-advanced multiplication/division levels, students must meet certain criteria. Typically, students need to earn 900 points on two activities, one for each operation.
The rationale for this requirement is that it allows students the opportunity to focus on their preferred strategies, and earning 900 points gives a student a good chance of passing the Level Lifter.
Answering all of an activity's problems correctly and within the assigned fluency rate earns a student 1000 points. Points are deducted for incorrect or not-yet-fluent responses.
How Teachers Can Manually Unlock Level Lifters
If you feel a student is ready to take a Level Lifter, you can unlock the Level Lifter for the student by doing the following:
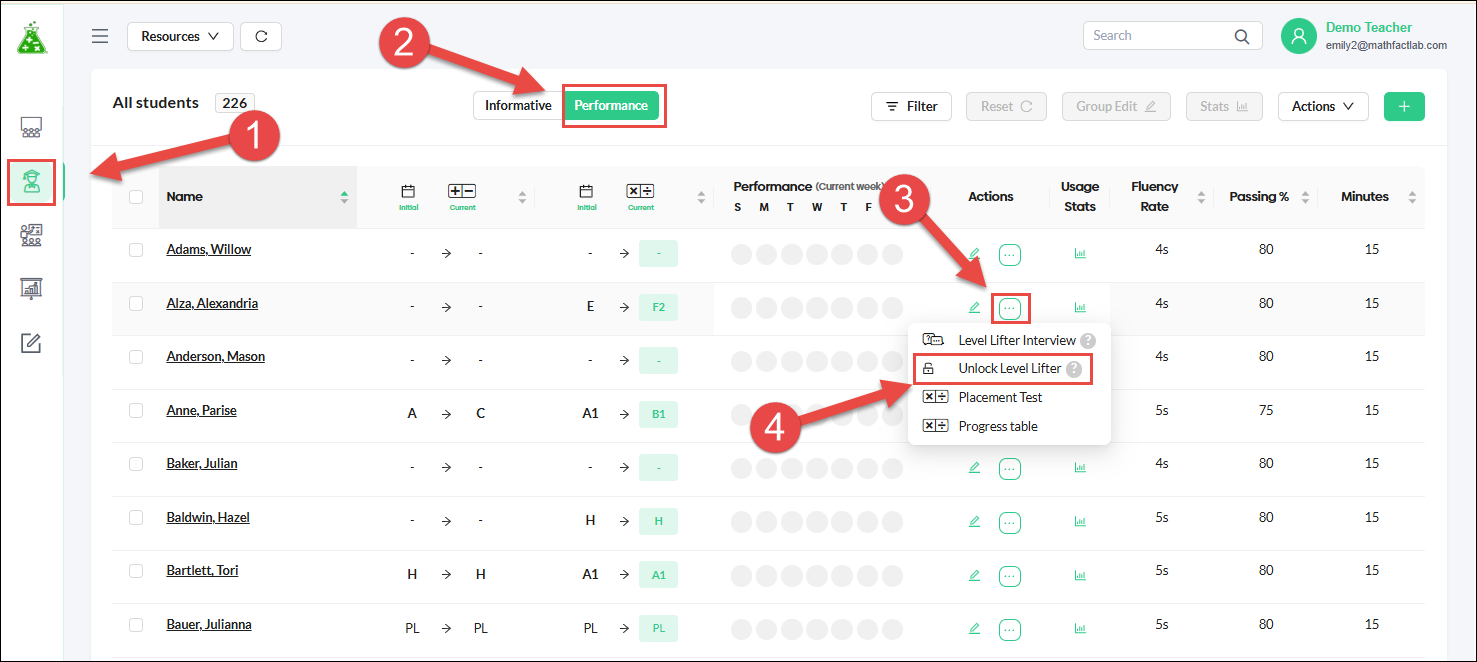
- Go to the Students tab on the teacher dashboard.
- Switch to the Performance side of the Students tab.
- Find the student whose Level Lifter you wish to unlock. and click the 3-dots action button on that student's row. (You'll find this in the Actions column, just beside the edit button.)
- Select 'Unlock Level Lifter'.
Have the student go to their dashboard or to refresh if they are already there. Their Level Lifter will now be available for them to take when ready.
Note: Unlocking the level lifter provides one-time access to the Level Lifter. Meaning, the typical requirements will again apply after the Level Lifter has been taken.
Level Lifter Passing Requirements
To move up a level, students need to demonstrate fluency with the newly learned facts of their current level, along with the facts from previous levels.
Fluency, here, means responding accurately to prompts within a student's assigned fluency rate. For example, if a student has an assigned fluency rate of 6 seconds, any correct response within 6 seconds would be considered fluent.
To pass a section of a Level Lifter, a student needs to meet their assigned Passing Percentage. By default, the Passing Percentage is set at 80%, but this can be changed either for individual students or for all of your students.
To level up, students need to meet passing requirements for both sections of their Level Lifter (for example, the addition and subtraction sections). If a student passes one of the sections but not the other, when they return to their dashboard at that level, they will only need to earn points in the operation for which they did not pass.
For example, let's say a student is on Level B and the student's Passing Percentage is set at the default of 80%. If the student takes the Level B Level Lifter and scores 85% on the addition section but 75% on the subtraction section, the student passes in addition but not in subtraction. This means that the student will return to the Level B dashboard but will only need to practice subtraction. Once the student meets the 900-point requirement in subtraction, they will unlock the Level Lifter again. The student will then only be required to take the subtraction section of the Level Lifter. If the student passes it, they will be promoted to Level C.
Retakes
Like all of us, kids make typos, so we take that into account on Level Lifters. Students are allowed to reanswer up to 15% of problems on each section of a Level Lifter. For example, if a section of a Level Lifter has 20 problems, students are allowed 3 retakes. If the student has answered any problems incorrectly or outside of their fluency rate, they will be reasked (up to 3 of these problems) as the final questions for that section. Student responses to these retake problems replace previous responses. Students are not informed that these are 'retake' problems.
Passing Percentage: How to Adjust Passing Requirements
Providing flexibility in passing requirements helps struggling students stay motivated. A student's score for any Level Lifter assessment is determined by the accuracy and fluency (speed) of their responses using the following point system:
- Responses that are fluent and accurate receive full points.
- Responses that are accurate but not fluent receive half points.
- Responses that are inaccurate receive no points.
To pass a Level Lifter assessment, a student must earn a minimum percentage of the total possible points. This passing benchmark is set by the teacher, and we call this the Passing Percentage.
The teacher can change the passing percentage for Level Lifters for individuals or groups of students. The passing percentage may be set from 50% to 100%. The default setting is 80%
This document provides step-by-step instructions on how to adjust the passing percentage for one or more students.
Level Lifter Interviews: An Alternative Means of Assessment
Some students, for a potential range of reasons, do not perform to their full potential on standard Level Lifters. For them, we have built Level Lifter Interviews. Level Lifter Interviews ask the same questions as a typical Level Lifter, but they are implemented by the teacher on the teacher's device and do not require any typing by the student.
You can give a student a Level Lifter Interview at any time. The student does not need to unlock the Level Lifter first. (Of course, we recommend that the student completes the practice activities first, to prepare themselves better.)
To begin a student Level Lifter Interview, do the following:
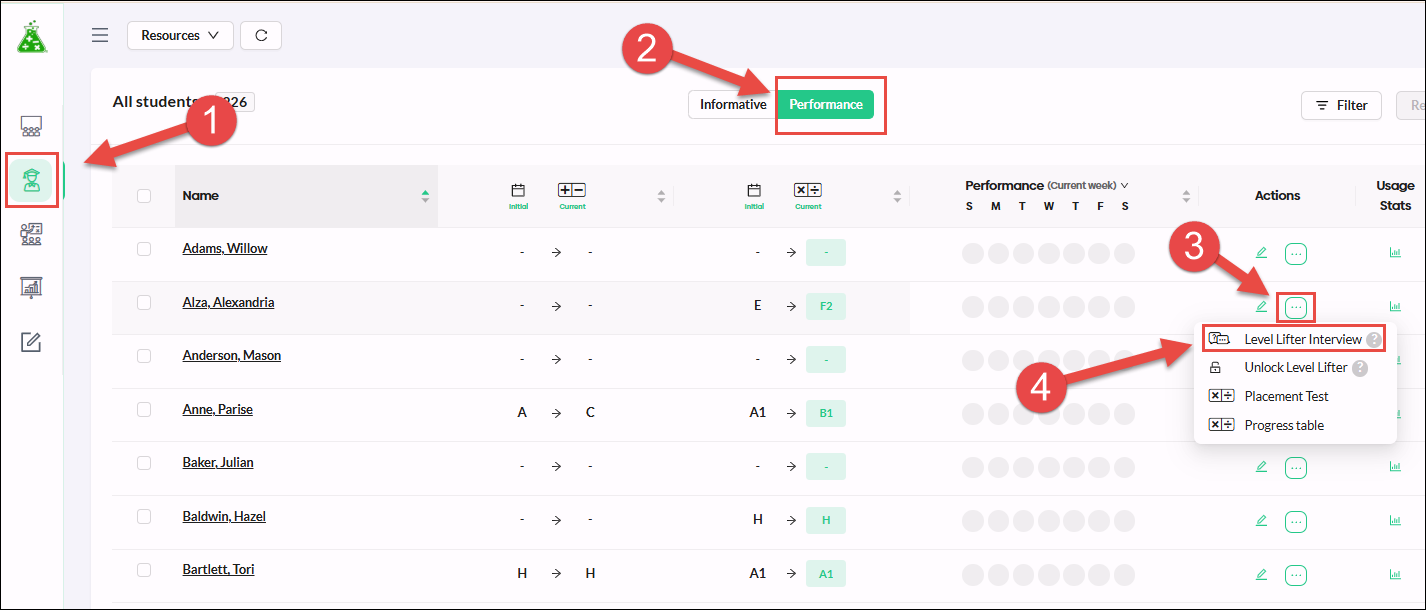
- Go to the Students tab on the teacher dashboard.
- Find the student whom you wish to interview.
- Click the 3-dots action button on that student's row. (You'll find this in the Actions column, just beside the edit button.)
- Select 'Level Lifter Interview'.
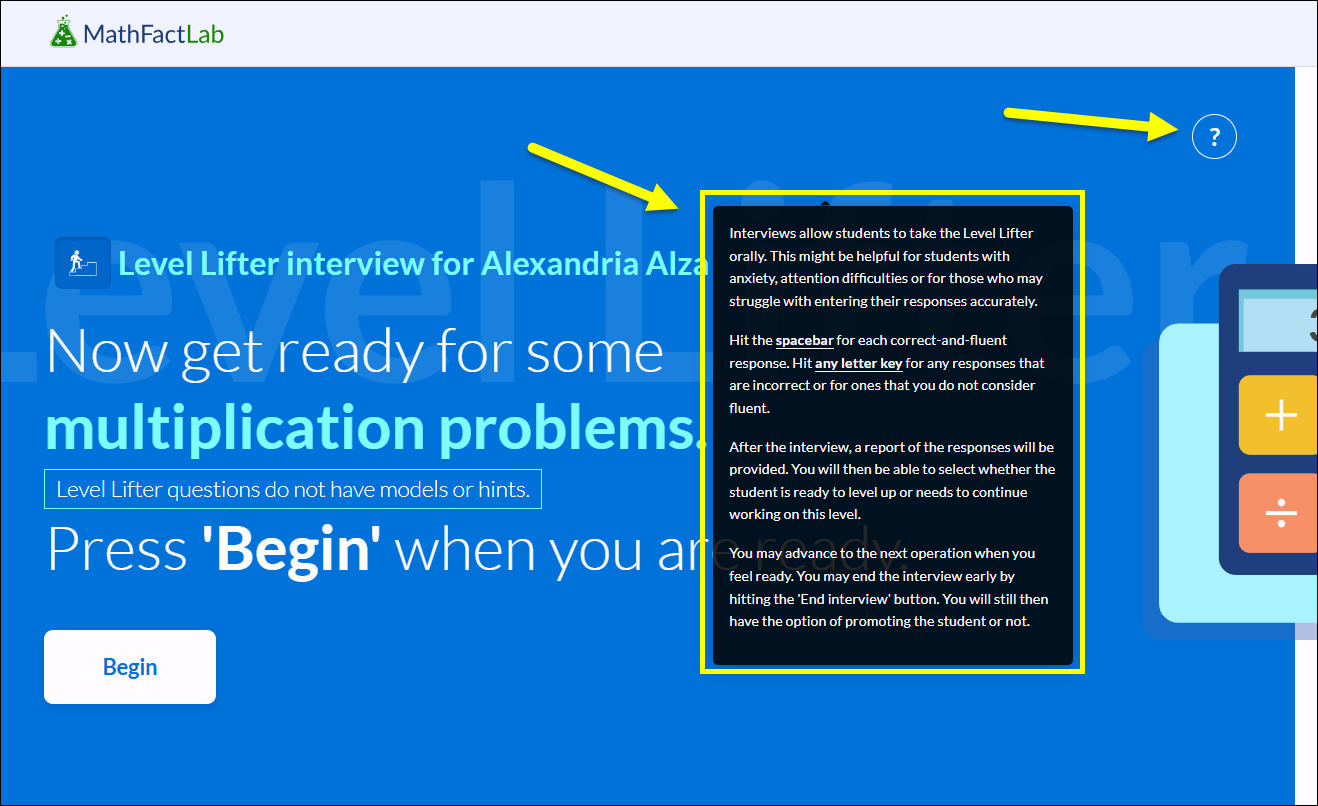
The interview is similar to a typical Level Lifter with the following exceptions:
- The student responds orally.
- The teacher determines if the answer is acceptable (by hitting the spacebar) or not (by hitting any key).
- Each section of the test can be ended at any point.
- After both parts of the interview are completed, the student's Level Lifter report is displayed. The teacher then determines if the student has passed by hitting one of two buttons: 'Level up!' or 'Not yet.'
@zoho