A Guide to Manual Rostering without Using CSV Files
This guide is for administrators of school or district accounts not integrated with ClassLink or Clever who do not want to roster staff or students using .csv files.
It outlines how to add staff and students individually and also describes our copy-and-paste method for quickly adding entire classes of students.
Table of Contents
Step 2: Add Sub-Administrators
Step 1: Add School(s)
Adding one or more schools is the first step in setting up your MathFactLab account. Once your schools are created, you can add classes within each school. After that, you can roster sub-administrators, teachers, and students.
To add a school:
- Click the Schools tab on the left. Here, you may add any schools that will have access to your account.
-
Click the 'Add School +' button in the top right of the Schools window.

- You will then be able to enter your first school's name.
This is for your use only, so do not feel you have to use the full name of the school. For example, 'Kennedy' may be a fine substitute for John F. Kennedy Elementary School.
- Click on the Green "Add School" button to finish adding this school to your account.

- Repeat Steps 2-4 until you have entered all the schools that you require.
Step 2: Add Sub-Administrators
Please note the following about sub-administrator accounts:
- You can create as many or as few sub-admins for your account as you wish.
- Sub-admin access is limited to the school(s) assigned to the sub-admin.
- Within assigned schools, sub-admins have many of the same permissions as super-admins.
- Sub-admins cannot add schools or other sub-admins.
- Teachers with sub-admin accounts can access their class(es) by using the Filter tool while on the Students tab to select their class or class(es).
- To learn more about sub-admin permissions, click here.
If you have a manually-rostered school/district account and wish to add a sub-admin who already has a teacher account, please delete that teacher account first. Staff members can be teachers or administrators, but not both.
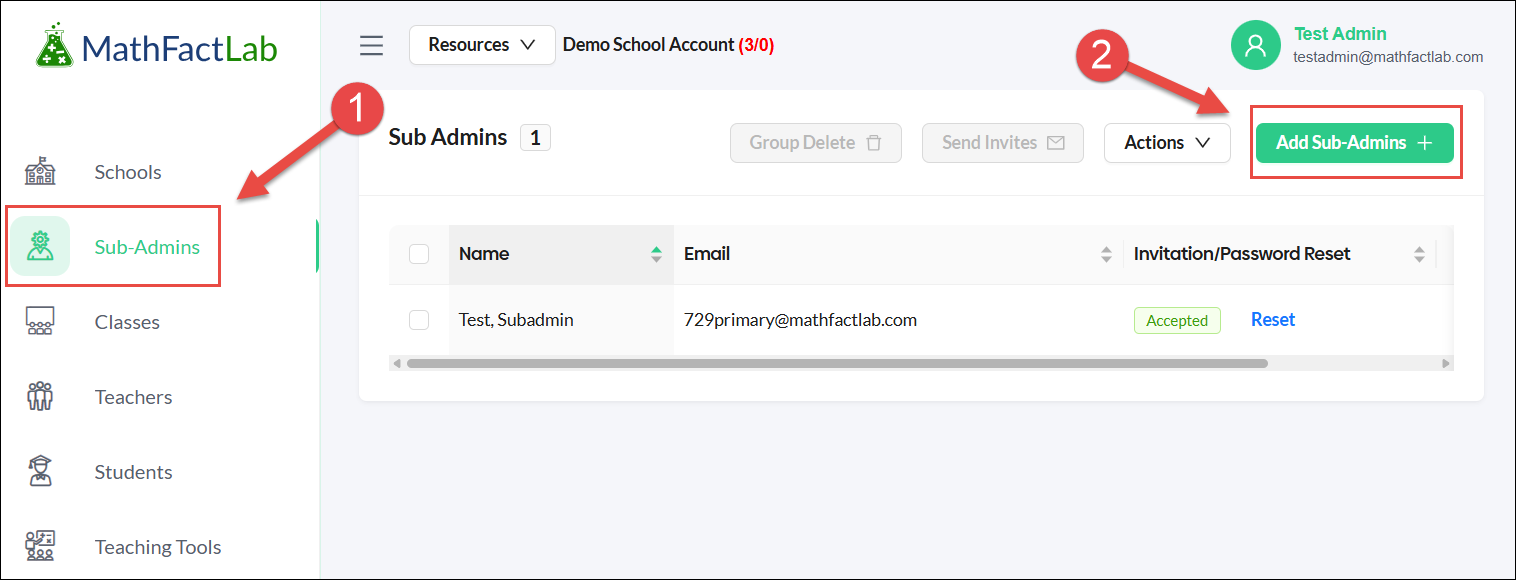
To Enter Sub-Admins Individually:
- Select the Sub-Admins tab.
- Click the Add Sub-Admins + button. This will open the 'New Sub-Admin' Screen.
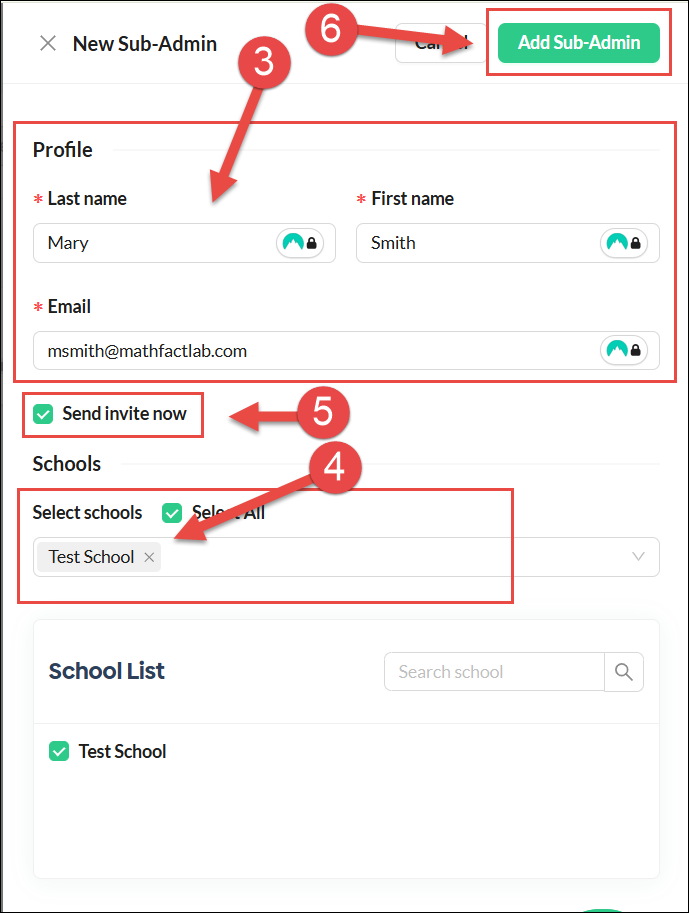
- Enter the sub-admin's name and email address.
- From the School List, select the school(s) that the sub-admin will be given access to.
- You can check this box to have an invitation automatically sent to this new sub-administrator, or leave it unchecked and send the invitation at a later time.
- Click Add Sub-Admin in the top right.
Repeat the above steps to add more sub-admins.
Step 3: Create Classes
- Only administrators can create classes.
- Classes must be created within schools, so at least one school must be added to the account first.
- All students must be assigned to exactly one class.
- MathFactLab classes do not need to match your actual school class structure; teachers may combine multiple groups into a single class if preferred.
- For a cleaner dashboard, we recommend using short class names (e.g., “Johnson” instead of “Mrs. Johnson’s Class”).
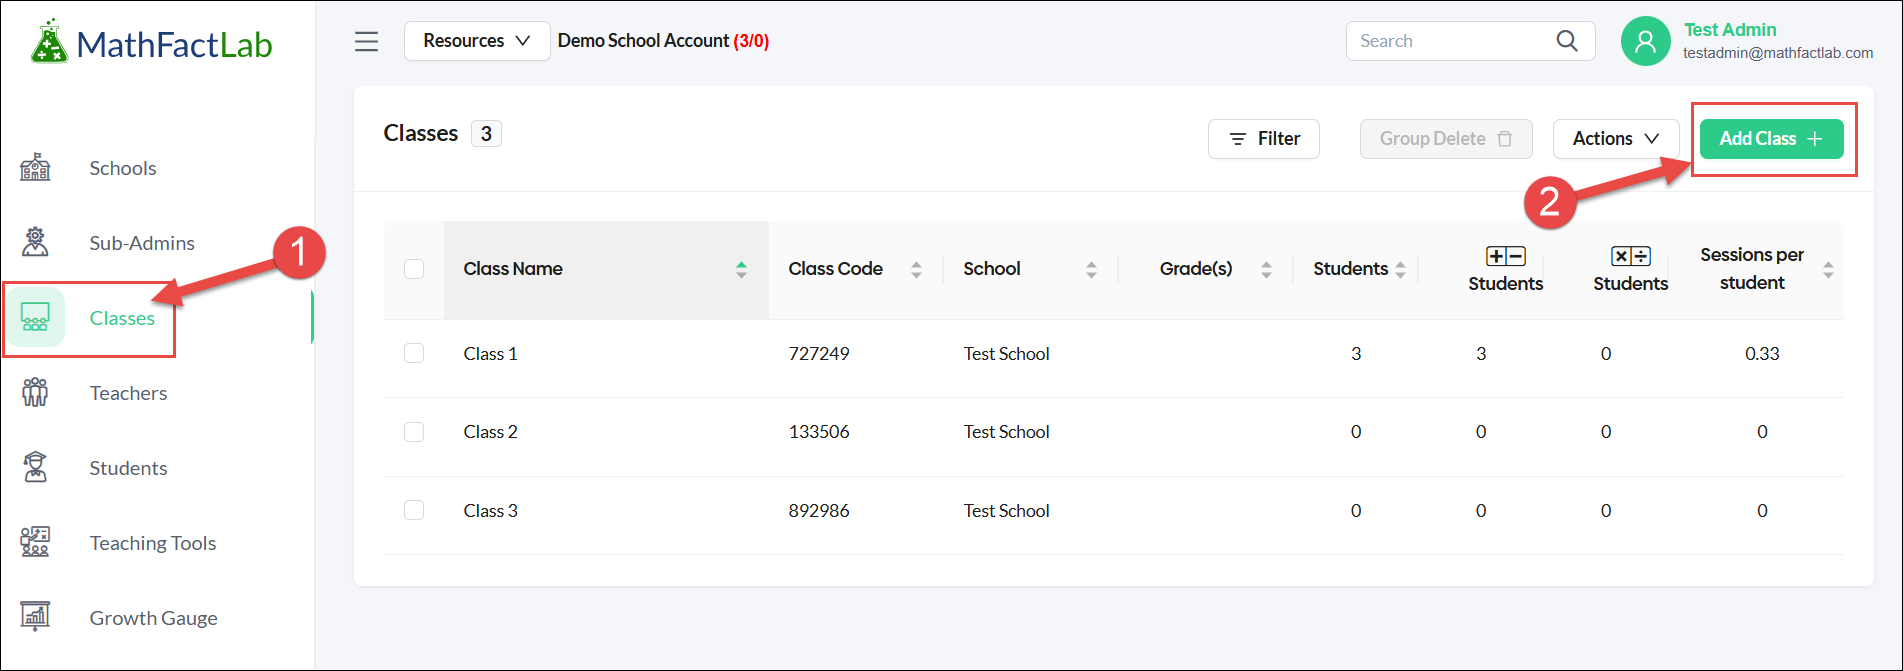
To Create Classes One-by-One:
- Select the Classes tab.
-
Click the Add Class + button in the top right. This will open up the 'New Class' pop-up window.
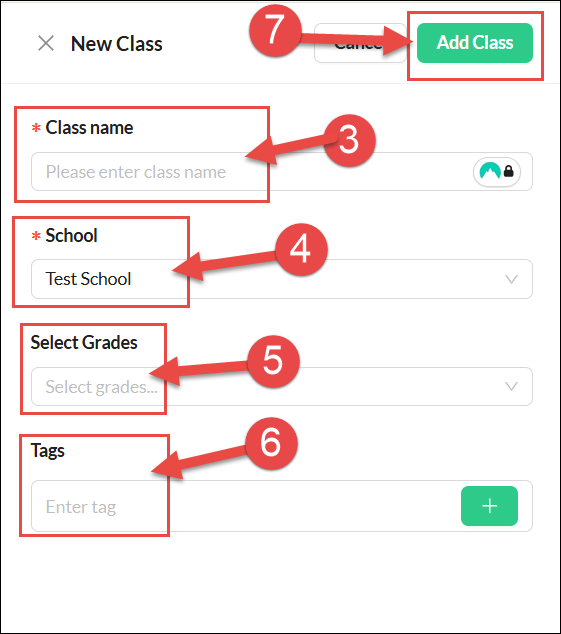
- Enter the class name.
- Select the school to which this class will be assigned.
- Select the grade level(s) for this class if you wish. This is an optional choice.
- Add one or more tags if you wish. This is also an optional choice.
- Click the Add Class button.

Repeat the above steps to add more classes.
Step 4: Add Students
- The methods described below are suitable for adding individuals or small groups of students. If you have a large number of students to roster, we suggest rostering via a CSV file upload.
- Currently, students need to be rostered via CSV file upload in order to have access to MathFactLab via Google SSO.
- Before rostering students, you may wish to find out from teachers whether they would like their students to start on addition/subtraction or multiplication/division. (This can, of course, easily be changed later on.)
To Add a Group of Students by Copying and Pasting:
- Select the Students tab.
- Hover over the green '+' button in the top right.
-
Select 'Add Multiple Students.'


- In the pop-up window, choose the school this group of students is attending.
- Choose the class this group of students is assigned to or create a new class. All students must be assigned to a single class.
-
Click on the Next link.

- Choose your preferred method for entering or copying and pasting your students' names; LastName, FirstName separated by a comma or FirstName LastName separated by a space.
- Enter or copy and paste your students into the text box. Any formatting errors will be displayed below this box and will need to be corrected before you can proceed.
- Choose the learning mode where most of your students will start, Addition/Subtraction or Multiplication/Division.
-
Click on the Next link.


- The students' usernames and passwords will be auto-created. You can change these on the Edit Student Details screen.
- You can also delete students by clicking on the trash can, change the spelling of their names, and change the learning mode for each student. All of these changes can be made at any time on the teacher dashboard by clicking the edit icon next to the student’s name.
-
Click on the Next link after you have finalized any changes.

- The final screen will confirm that your students have been added to the classroom you designated.
- You have the option to Print Login Cards for all the students in this class.
- You can repeat the process for another class by clicking on the 'Add students to another class' button.
- Click on the Exit link when you have finished.


To Add Students Individually:
- Select the Students tab.
- Hover over the green '+' button in the top right.
- Select 'Add Single Student'. This will open up the 'New Student' pop-up.

- Enter the student's Last name and First name.
- A Username will be auto-generated. You may override this username, if you wish, and add your preferred credentials. A unique username is required for every student.
- A Password will also be auto-generated. You can change the password if you wish. Passwords must have at least five characters. For security reasons, please don't give students the same password.
- Under Class Assignment, select the class to which the student will be assigned. Select the Student learning mode: either Addition/Subtraction or Multiplication/Division.
-
Make sure to hit Add Student at the top right when done.


Repeat the steps above to create accounts for additional students.
Step 5: Add Teachers
Please note the following concerning teacher accounts:
- Before adding teachers, one or more schools and the classes to be taught should be added to your account.
- You will have the option to send the new teacher invitation out immediately or wait until it's more convenient. Teachers should be told to expect the account invitation if you are sending it out immediately.
- Individual teachers can be assigned to as many or as few classes as necessary. Teachers can be assigned to classes in multiple schools within one MathFactLab account.
- As teacher account logins require email addresses, if a teacher wishes to have access to a second MathFactLab account, they will need to use a different email address.
- Teachers can be added manually or via a .csv file.
If a teacher already has a MathFactLab teacher account and accepts an invitation to a MathFactLab district/school account, using the same email address, all data from the teacher account will be deleted upon their acceptance of the district/school account invitation. For this reason, we suggest that before accepting their invitation, teachers run reports for any data they wish to keep. This loss of data is clearly spelled out in red in the invitation teachers receive, but we still recommend giving them a heads-up first!
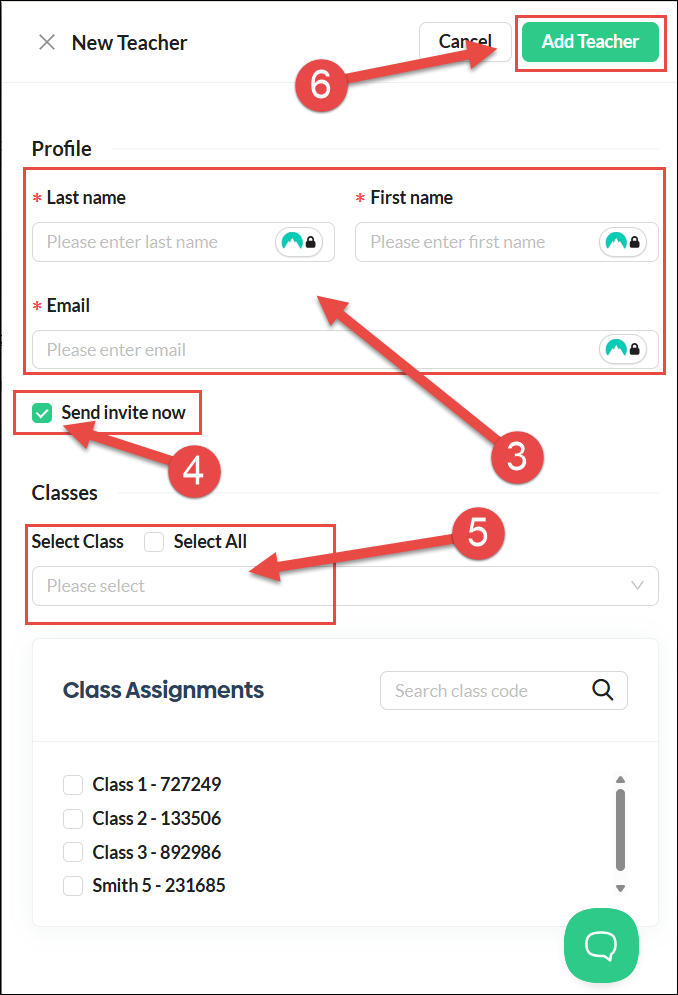
To Add Teachers Manually:
- Select the Teachers tab.
-
Click on the green Add Teacher + button in the top right corner. This will open up the 'New Teacher' pop-up.

- Enter the teacher's name and email address.
- Click in the Send invite now checkbox if you wish for the invitation email to go out immediately.
- Select the teacher's class(es) from the Class Assignments list.
-
Click the Add Teacher button.


Repeat Steps 1 through 6 until you have entered all of your teachers.
Additional Points
Professional Development
- The MathFactLab DIY Professional Development Training Guide will help get you and your teachers in a position to get the most out of MathFactLab
Account Invitations
- After you've completed the above steps, sub-admins and teachers will need to accept their invitations. These invitations can be resent from your dashboard.
Login Cards
- You can generate and print out student login cards for teachers by clicking the 'Actions' button on the top right of the Students tab. This is also something teachers can do themselves.
Editing Student Settings
- As an admin, you can also make all of the setting changes for individual students or for classes that are available to teachers. The 'Group Edit' feature on the Students tab can make this a very quick process.
- By default, students will be assigned to addition/subtraction. However, students can start the program with multiplication/division instead.
- You may wish to check in with teachers to see which learning mode they wish their students to begin with.
- To switch an entire class from one learning mode to the other, do the following:
- Select the Students tab.
- Choose the class from the Classes using the filter tool.
- Click the checkbox in the header row to select all students.
- Click 'Group Edit'.
- Select the appropriate Learning Mode for the class.
- Click 'Save'.
Reports
- Depending on the level of granularity you seek, you can monitor usage and progress from the Schools, Classes, or Students tab. Each of these allows you to download the tab's data by clicking the 'Actions' button and selecting 'Export CSV'.
- These Guides may prove useful: Reports and Admin Reports.
Permissions by Role
- Please visit this help doc to better understand the various levels of access permitted by role.